


Hey everyone I am Hasnain Makada, currently working as a Developer Advocate at Napptive where I explore the platform deeply and educate the community about DevOps. I am mostly interested in the field of Android Development using Flutter and in this blog, I am going to explain to you about Provider, what provider is and how it manages the state of your app and I am also going to show you a hands-on demo of provider
But first of all, before starting let's discuss state management in flutter and understand what a state is.
What is State Management in Flutter?
In simple words, if I tell you the definition of a state. "State is any data which is updated periodically in flutter".
While developing android apps managing the state is one of the most complex tasks which developers come across and also state management is one of the most critical processes of the android lifecycle. Let's take the example of amazon, Whenever we are buying anything or adding anything to our cart the cart updates dynamically without even rebuilding the whole Ui and that's where state management plays a major role.
There is also a setState function in flutter which can also be used to update the state of the application but in setState it rebuilds the whole Ui, So if we want to build out any particular widget in our app again and again we cannot do it with setState as it will rebuild the whole Ui and it is also considered a bad practice to use it. If your application needs to rebuild a widget only once setState is good but if we want to rebuild it then it is best to use any of the state management libraries in Flutter.
State management libraries in Flutter
In Flutter there are a lot of state management libraries to get started with and the most widely used libraries are as follows...
- Provider
- Riverpod
- setState
- InheritedWidget & InheritedModel
- BLoC / Rx
Out of all these libraries, The provider is the most used state management solution so far and it is also recommended by flutter. If you want to get started with it you can check it out here
Now that we've discussed various state management approaches, Let's get started with provider,
What is Provider?
Flutter provider is the most widely used state management library as it is the easiest to get started with. Provider provides almost anything which a Flutter developer needs to manage the state of your app. Provider is basically a wrapper around the Inherited widget.
Provider completely removes the complexity to write inherited widgets and also provides many features such as,
- Simplified allocation/disposal of resources (widgets)
- Lazy-loading
- A vastly reduced boilerplate over making a new class every time
- Devtool friendly – using Provider, the state of your application will be visible in the Flutter Devtool
In Provider, it almost provides all the classes and widgets to manage state, Listen to changes, rebuild widgets and so on... If you want to know more about provider check out its official documentation
Let's get started with Provider
Now that we're done with the introduction part, Let's get started with the demo of provider,
Create a new Flutter project in your drive or desktop flutter create provider_example
Install the provider dependency inside your project by running flutter pub add provider. For this blog, we're going to create a simple counter app in which I will explain to you about the ChangeNotifier, Consumer and ChangeNotifierProvider widgets which the provider gives us.
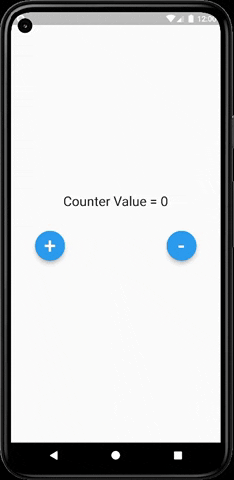
Before using Provider let's design the layout of the app, Remove all the boilerplate code and paste this code inside the build method of the HomePage widget
return Scaffold(
      body: Center(
          child: Column(
        mainAxisAlignment: MainAxisAlignment.center,
        children: [
          Text(
            "Counter Value = ",
            style: TextStyle(fontSize: 25),
          ),
          SizedBox(
            height: 40,
          ),
          Row(
            mainAxisAlignment: MainAxisAlignment.spaceAround,
            children: [
              FloatingActionButton(
                onPressed: () {},
                child: Text(
                  "+",
                  style: TextStyle(fontSize: 40),
                ),
              ),
              SizedBox(
                width: 10,
              ),
              FloatingActionButton(
                onPressed: () {},
                child: Text(
                  "-",
                  style: TextStyle(fontSize: 40),
                ),
              ),
            ],
          ),
        ],
      )),
    );
Now that our design is implemented successfully, Let's get started using provider.
Inside the lib folder create a new file named CounterProvider.dart and inside that file define this code,
class CounterProvider extends ChangeNotifier {
  int initialState = 0;

  void counterIncrement() {
    initialState++;
    notifyListeners();
  }

  void counterDicrement() {
    initialState--;
    notifyListeners();
  }
}
In the above file, we have defined a CounterProvider which will have a variable initialState which will be the initial value of our counter app and extended it with the change notifier class which will generally provide us with the live changes in our state. After then we have made 2 methods counterIncrement & counterDicrement which will notify us of the latest values of our state. The notifyListeners() method plays a very important role in notifying the state of our app and without that we will not be able to listen to the changes being made.
Now our Counter Provider is ready, We have to implement it inside our main.dart file for managing state.
import the provider package inside the main.dart file
import 'package:provider/provider.dart';
Now wrap your MaterialApp widget with the ChangeNotifierProvider widget. With the help of the ChangeNotifierProvider, it will create the instance of our counter provider across our whole application so we can efficiently access the methods and properties of the counter provider inside our app.
 return ChangeNotifierProvider(
      create: (context) => CounterProvider(),
      child: MaterialApp(
        debugShowCheckedModeBanner: false,
        title: 'Flutter Demo',
        theme: ThemeData(
          primarySwatch: Colors.blue,
        ),
        home: HomePage(),
      ),
    );
It's time to test the working of our provider, wrap the Text widget which will show the counter value with the consumer widget with the type CounterProvider. The consumer method will provide us with a build method inside which it will listen to the state changes of our counter value.
Consumer<CounterProvider>(
              builder: (context, data, child) {
                log("Value updated");
                value = data.initialState;
                return Text(
                  "Counter Value = ${data.initialState}",
                  style: const TextStyle(fontSize: 25),
                );
              },
            ),
I've also put a log statement which will print every time our counter value gets updated.
Now we have to call the increment and decrement methods inside the onPressed methods to listen to the value change, you can call the methods with the Provider.of<T>(context) method or you can first create an instance of it and then call it, It totally depends on you.
onPressed: ()
{
     Provider.of<CounterProvider>(context, listen: false).counterIncrement()
}
Similarly, call the decrement function inside the onPressed event of the - minus button
Now it's time to test our application and see whether provider is working correctly or not.
As you can clearly see from the below image that our text widget (which prints the actual value) gets updated every time we increment or decrement the value and do not rebuild the whole UI of our app.

The main HomePage widget is built only once throughout the app and only the text widget gets updated every time the value changes. This saves a lot of resources and improves the app performance and also persists the state of the app.
Now that we've seen the provider demo, Let's discuss the Consumer widget in flutter and how it rebuilds a particular widget in Flutter.
What is Consumer widget in provider?
The consumer widget in flutter is used to build widgets that need to be updated as per the state, consumer widget will listen to the changes in the state and update the widget accordingly
The consumer widget mainly provides 2 properties builder & child properties. The builder property accepts the widget which needs to be rebuilt as per the change in state. The builder property accepts 3 arguments context, data & child. The data property is mainly used to access all the properties of the modal provider which you have passed in the Consumer<Type>
The child property is mainly used to display any widget which doesn't need data inside the provider, so when the data gets updated they don't re-create since they don't need the data, rather they are passed as a reference to the builder.
So that's all about the consumer widget in provider, if you want to know more about it you can check it out Here
Conclusion
I hope that by now you've got a basic understanding of how provider works, how it is used to manage state in flutter and how state management works in Flutter. If you have any doubts related to Flutter & DevOps feel free to reach out on Twitter & Showwcase