Let's understand Internationalizing in Flutter
In this article, I am going to make you understand internationalization Flutter in the easiest way possible


Introduction
Hey everyone, I am Hasnain Makada and currently, I am working as an Elite Flutter Developer with Showwcase where I work on projects by partner companies and enhance my skills. I also have my Open Source community named "Open Source With Hasnain" where I provide excellent resources for learning all kinds of tech stacks to all beginners and experienced developers.
Today, In this blog we are going to dive deep and understand what is internationalization in Flutter, how you can implement it inside your apps and how you can make your apps go global.
But first of all, let's try to understand What the heck is Internationalization?
What is Internationalization?
If anyone tells me to explain internationalization in one line then my answer would be,
"Making your apps adaptable to multiple languages and locales"

Internationalizing your Flutter application means making it suitable for use by people from different countries and language backgrounds. It involves the adaptation of your application so that it can display text, images and content in multiple languages and accommodate various cultural preferences.
Internationalization includes the conversions of widgets adaptability, language and the overall application. It is a core topic which every developer should keep in mind when deploying a production-ready application, because if you want your Flutter app to be used around the world, then internationalizing is a must.
The general pronunciation of internationalization is "i18n" (the first letter i and the last letter n and 18 other characters in between).
That was the general introduction to what internationalization is and why it is used, Now let's dive more deeply into the topic

Benefits of Internationalization
i18n offers several benefits for software and applications, here are some of the key benefits mentioned below 👇
Wider User Base: By offering your product or service in multiple languages and accommodating different cultures, you can reach a wider audience and generate more traffic resulting in a large customer base.
Enhanced User Experience: Generally users tend to prefer using the product or software in their native language which results in a more comfortable and seamless experience for the user.
Scalability: By providing i18n, Your application has the chance to gain popularity and expand into new markets and it also allows you to scale more efficiently. You can add new languages and regions without having to rework the entire application.
Improved SEO and Discoverability: Users tend to search for your product more in their native language rather than user other languages, so providing i18n will eventually improve your SEO searchability on the web and make your applications more discoverable.
There are more benefits of i18n which you can search it on the web and analyse how important i18n is to your applications.
Providing Internationalization inside Flutter Apps
To provide internationalization inside your Flutter apps you have to install the flutter_localization package which will equip you with all the necessary functions and methods to localize your app.
Note: Flutter by default only provides the US English Localizations
The application which we are going to build today is just a simple demo of how widgets get adapted to internationalization settings.
We are only going to provide 2 locals, Spanish and English
To create the flutter, open your terminal and run the below command 👇
flutter create internationalization_demo
Wait for a few seconds/minutes and your app will be created successfully, then install the necessary dependencies needed for the app.
flutter pub add flutter_localizations --sdk=flutter
The above command will install the flutter_localization package by specifying the SDK to be used, in case it is set to flutter.
Next, remove all the boilerplate code and clean the MyHomePage widget inside the main.dart file and write the code for implementing the internationalization inside your app.
import 'package:flutter/material.dart';
import 'package:flutter_localizations/flutter_localizations.dart';

void main() {
  runApp(const MyApp());
}

class MyApp extends StatelessWidget {
  const MyApp({super.key});

  // This widget is the root of your application.
  @override
  Widget build(BuildContext context) {
    return MaterialApp(
      title: 'Flutter Demo',
      debugShowCheckedModeBanner: false,
      localizationsDelegates: [
        GlobalMaterialLocalizations.delegate,
        GlobalWidgetsLocalizations.delegate,
        GlobalCupertinoLocalizations.delegate,
      ],
      supportedLocales: [
        Locale('en'),
        Locale('es'),
      ],
      theme: ThemeData(
        colorScheme: ColorScheme.fromSeed(seedColor: Colors.deepPurple),
        useMaterial3: true,
      ),
      home: const MyHomePage(),
    );
  }
}

class MyHomePage extends StatefulWidget {
  const MyHomePage({super.key});

  @override
  State<MyHomePage> createState() => _MyHomePageState();
}

class _MyHomePageState extends State<MyHomePage> {
  @override
  Widget build(BuildContext context) {
    return Scaffold(
      appBar: AppBar(
        title: Text('Internationalization Demo'),
      ),
      body: Center(
        child: Column(
          mainAxisAlignment: MainAxisAlignment.center,
          children: [
            Localizations.override(
              context: context,
              locale: Locale('en'),
              child: Builder(
                builder: (context) {
                  return CalendarDatePicker(
                    initialDate: DateTime.now(),
                    firstDate: DateTime(1990),
                    lastDate: DateTime(2100),
                    onDateChanged: (value) {},
                  );
                },
              ),
            ),
          ],
        ),
      ),
    );
  }
}
Let's understand the above code step-by-step
Inside the material app widget, we are providing the
localizationsDelegateslist which will define localization for material widgets, Cupertino widgets and all the global widgets which we define inside the app.Next, we are providing the
supportedLocallist which will define the locales our application is going to support, for this demo, I've provided 2 locals, the first is English and the second one is Spanish.Moving on to the
MyHomePagewidget, we are overriding thelocalizations.overridefunction which will help us to provide localization to any specific widget of our app. For this case, we are using the CalenderDatePicker widget which is a normal inbuilt widget in Flutter for picking the date from a calendar.inside the overriding function of localizations, we have provided the English local, so it will render the calendar as per the English language, if you want you can provide other locals as well and test it as per your needs.
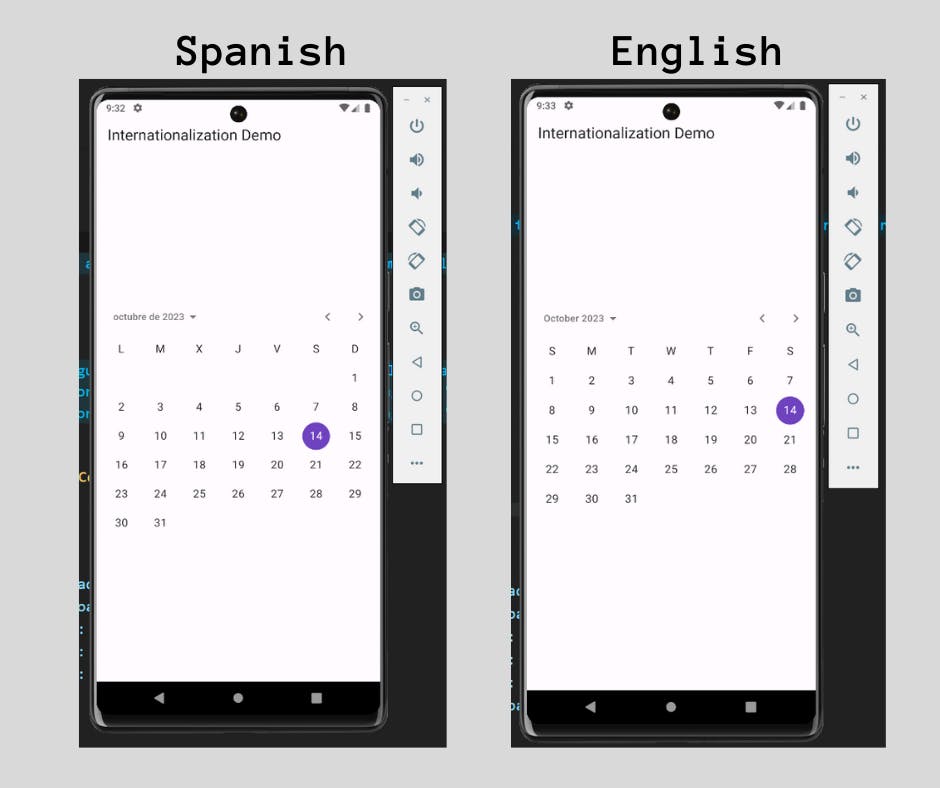
So that was all the general explanation of the code which we've written, Now let me show you the running output as well.
Final Output
Reference links
If you want to dive more deeply into the concept of internationalization and understand how to provide it based on certain use cases, check out the official docs of Flutter
📌 https://docs.flutter.dev/ui/accessibility-and-internationalization/internationalization
📌 https://www.geeksforgeeks.org/flutter-internationalization/
Wrapping up!!!
That's it we've successfully reached the end of this article and so far we have learnt about the following topic
What is internationalization in general and how to provide it inside Flutter?
What are some of its benefits?
Example of how to code it inside Flutter
If you have any further doubts related to Flutter, DevOps or Open Source, feel free to reach me at my X Handle and Showwcase
Till then, Happy Coding 😄